Developer Guide
Acknowledgements
- This project was based on the AddressBook3 application which can be found here
Design
Architecture
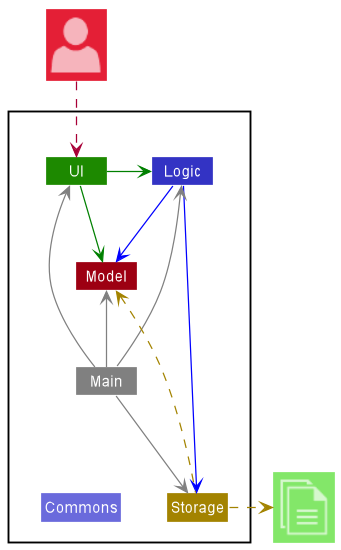
The Architecture Diagram given above explains the high-level design of the App.
Given below is a quick overview of main components and how they interact with each other.
Main components of the architecture
Main has two classes called Main and MainApp. It is responsible for,
- At app launch: Initializes the components in the correct sequence, and connects them up with each other.
- At shut down: Shuts down the components and invokes cleanup methods where necessary.
Commons represents a collection of classes used by multiple other components.
The rest of the App consists of four components.
-
UI: The UI of the App. -
Logic: The command executor. -
Model: Holds the data of the App in memory. -
Storage: Reads data from, and writes data to, the hard disk.
How the architecture components interact with each other
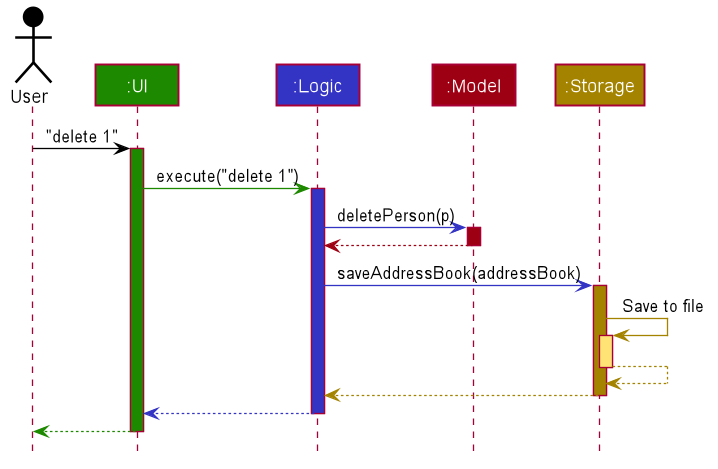
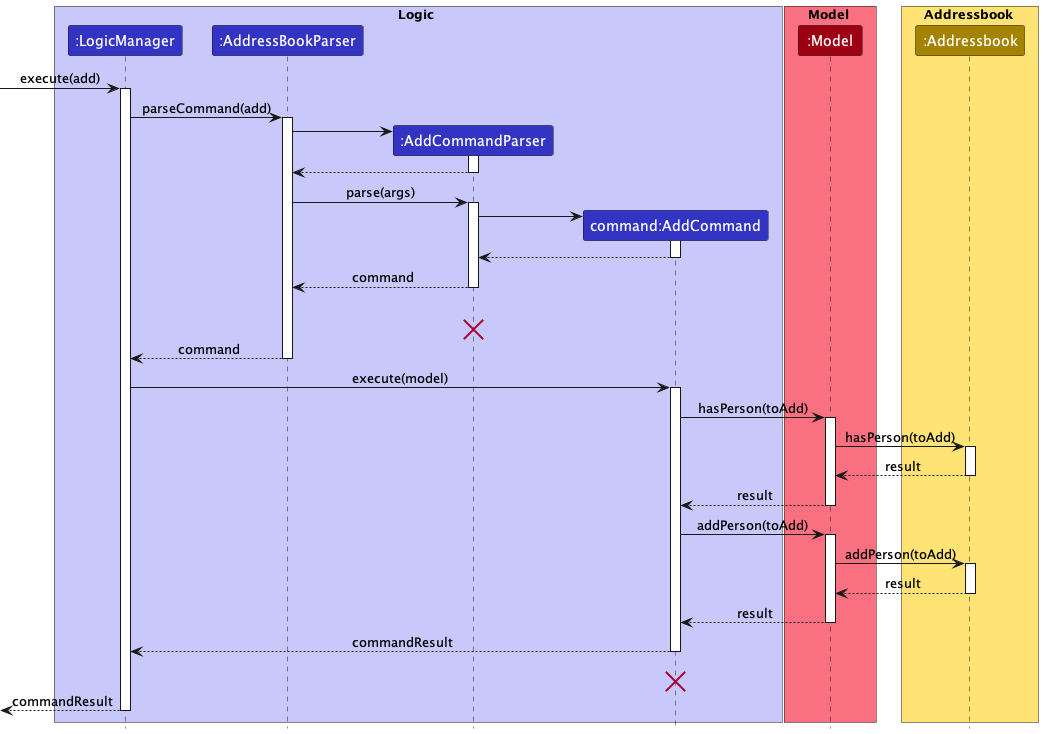
The Sequence Diagram below shows how the components interact with each other for the scenario where the user issues the command delete 1.
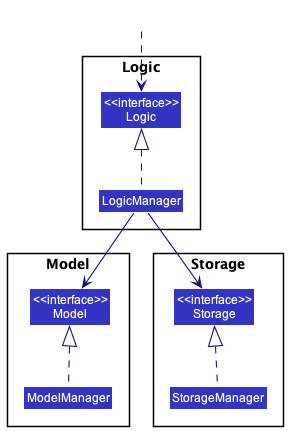
Each of the four main components (also shown in the diagram above),
- defines its API in an
interfacewith the same name as the Component. - implements its functionality using a concrete
{Component Name}Managerclass (which follows the corresponding APIinterfacementioned in the previous point.
For example, the Logic component defines its API in the Logic.java interface and implements its functionality using the LogicManager.java class which follows the Logic interface. Other components interact with a given component through its interface rather than the concrete class (reason: to prevent outside component’s being coupled to the implementation of a component), as illustrated in the (partial) class diagram below.
The sections below give more details of each component.
UI component
The API of this component is specified in Ui.java
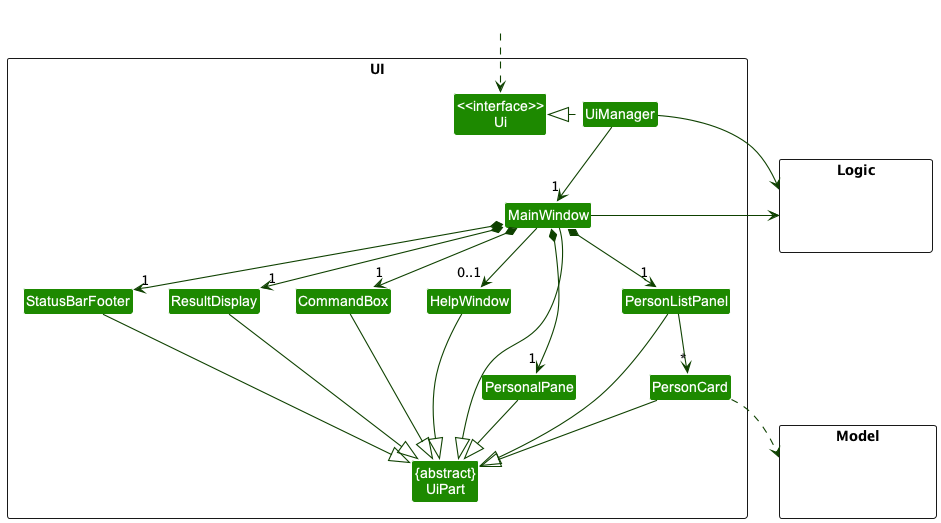
The UI consists of a MainWindow that is made up of parts e.g.CommandBox, HelpWindow, PersonalPane, PersonCard, ResultDisplay, PersonListPanel, StatusBarFooter etc. All these, including the MainWindow, inherit from the abstract UiPart class which captures the commonalities between classes that represent parts of the visible GUI.
The UI component uses the JavaFx UI framework. The layout of these UI parts are defined in matching .fxml files that are in the src/main/resources/view folder. For example, the layout of the MainWindow is specified in MainWindow.fxml
The UI component,
- executes user commands using the
Logiccomponent. - listens for changes to
Modeldata so that the UI can be updated with the modified data. - keeps a reference to the
Logiccomponent, because theUIrelies on theLogicto execute commands. - depends on some classes in the
Modelcomponent, as it displaysPersonobject residing in theModel.
Logic component
API : Logic.java
Here’s a (partial) class diagram of the Logic component:
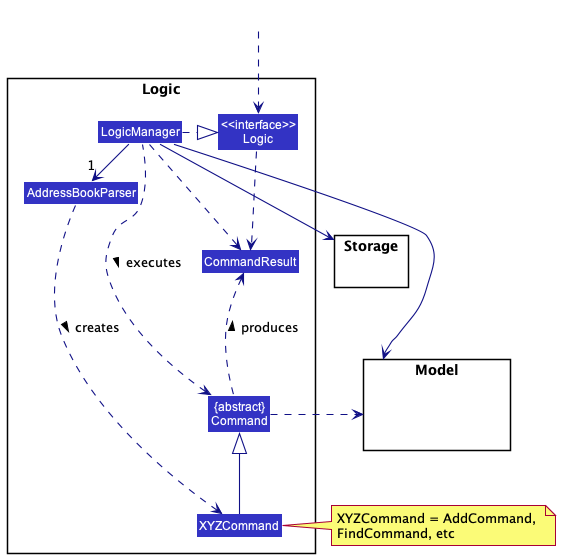
How the Logic component works:
- When
Logicis called upon to execute a command, it uses theAddressBookParserclass to parse the user command. - This results in a
Commandobject (more precisely, an object of one of its subclasses e.g.,AddCommand) which is executed by theLogicManager. - The command can communicate with the
Modelwhen it is executed (e.g. to add a person). - The result of the command execution is encapsulated as a
CommandResultobject which is returned back fromLogic.
The Sequence Diagram below illustrates the interactions within the Logic component for the execute("delete 1") API call.
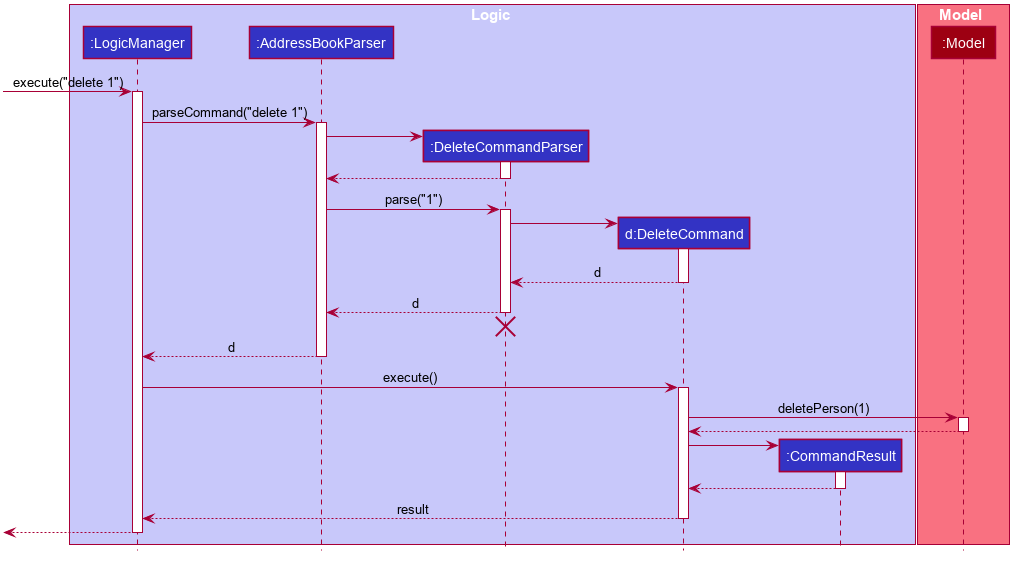
DeleteCommandParser should end at the destroy marker (X) but due to a limitation of PlantUML, the lifeline reaches the end of diagram.
Here are the other classes in Logic (omitted from the class diagram above) that are used for parsing a user command:
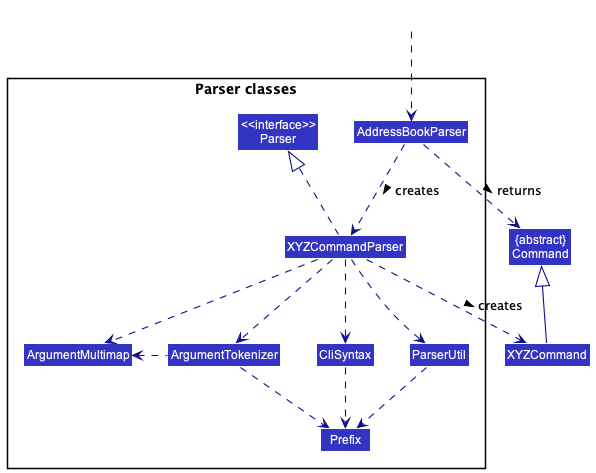
How the parsing works:
- When called upon to parse a user command, the
AddressBookParserclass creates anXYZCommandParser(XYZis a placeholder for the specific command name e.g.,AddCommandParser) which uses the other classes shown above to parse the user command and create aXYZCommandobject (e.g.,AddCommand) which theAddressBookParserreturns back as aCommandobject. - All
XYZCommandParserclasses (e.g.,AddCommandParser,DeleteCommandParser, …) inherit from theParserinterface so that they can be treated similarly where possible e.g, during testing.
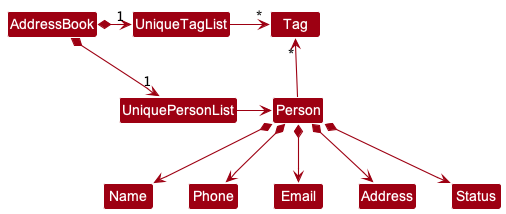
Model component
API : Model.java
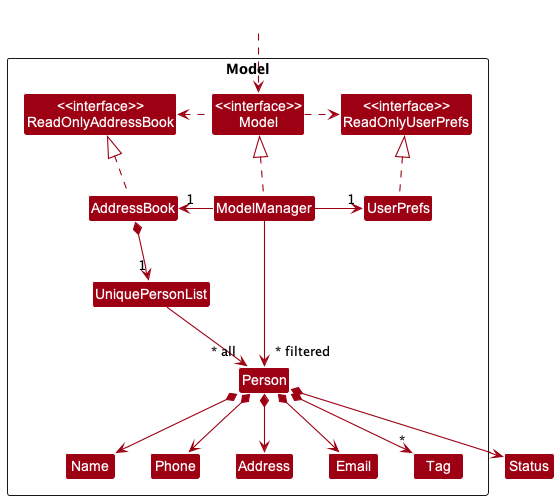
The Model component,
- stores the address book data i.e., all
Personobjects (which are contained in aUniquePersonListobject). - stores the currently ‘selected’
Personobjects (e.g., results of a search query) as a separate filtered list which is exposed to outsiders as an unmodifiableObservableList<Person>that can be ‘observed’ e.g. the UI can be bound to this list so that the UI automatically updates when the data in the list change. - stores a
UserPrefobject that represents the user’s preferences. This is exposed to the outside as aReadOnlyUserPrefobjects. - does not depend on any of the other three components (as the
Modelrepresents data entities of the domain, they should make sense on their own without depending on other components)
Tag list in the AddressBook, which Person references. This allows AddressBook to only require one Tag object per unique tag, instead of each Person needing their own Tag objects.
Storage component
API : Storage.java
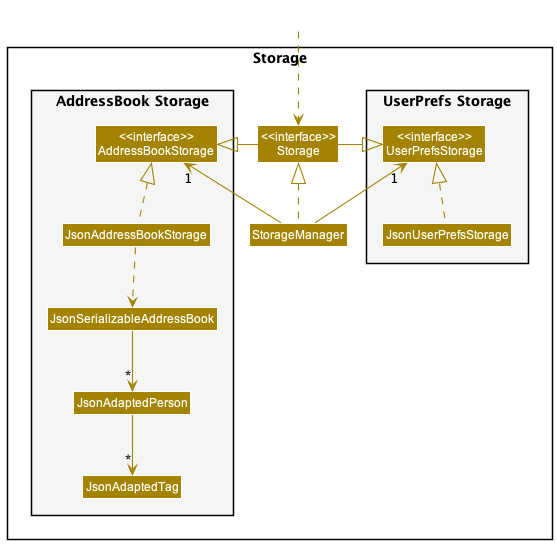
The Storage component,
- can save both address book data and user preference data in json format, and read them back into corresponding objects.
- inherits from both
AddressBookStorageandUserPrefStorage, which means it can be treated as either one (if only the functionality of only one is needed). - depends on some classes in the
Modelcomponent (because theStoragecomponent’s job is to save/retrieve objects that belong to theModel)
Common classes
Classes used by multiple components are in the seedu.addressbook.commons package.
Implementation
This section will focus on the implementation of the various features that BookFace provides. UML diagrams will be included to facilitate the explanation for the implementations.
Note: When viewing the sequence diagrams provided, it can be seen that the lifeline of several classes extend beyond its destroy marker (X). A proper sequence diagram will have the lifeline terminated at that point. However, due to the limitations of PlantUML (the software used to generate the UML diagrams), the lifeline extends beyond the destroy marker until the end of the diagram.
Add Feature
Add Implementation
The Add feature is facilitated by the classes AddCommand,
AddCommandParser and ParserUtil.
The AddCommandParser first parses through the user command to obtain
the necessary inputs through using ParserUtil#parseIndex. Following which an
instance of a AddCommand containing the details encapsulated in Person class is returned.
AddCommand#execute is then called, which sets the image of the contact
at the desired index to a default image, and deletes the existing person through
DeleteCommand.
Given below is an example usage scenario for how the add mechanism behaves.
Step 1: User starts up the application and sees their list of contacts. User must then enter name, status, phone, email, address as they are required by the system if not it will cause an invalid exception.
Step 2: The user can add optional fields, that is the tags. Each of the tags is colour-coded based on its type.
Note: If the user inputs a contact that exists in the contact list, or if the user misses out a compulsory input, an error will be thrown.
Step 3: If the instruction was valid, AddCommand#execute is called to wrap the details into person and set the
person to the next available index.
Step 4: User can use edit index to select the chosen person card and EditCommand#execute is then called to
change the contents inside and update the program directory.
The following sequence diagram shows how the add operation works.
The following activity diagram summarizes what happens when a user executes a
add command:

Design Considerations:
-
Alternative 1 (current choice): Improve on tags by adding more colours to the
program directory.
- Pros:
- Ensures the labels are organised neatly in different colour
- Cons:
- Extra complexity in requiring to map the additional tag operations
- Pros:
-
Alternative 2: Make status field compulsory from program directory.
- Pros:
- Easier to implement and user can search based on year and course
- Cons:
- Application will not detect the input content from the users which could contain non-related strings.
- Pros:
Delete Feature
Delete Implementation
The delete command allows users to delete a contact based on the provided index.
This feature is facilitated by the ParserUtil, DeleteCommandParser, and
DeleteCommand classes. The user input is first passed to an instance of DeleteCommandParser,
which calls on ParserUtil#parseIndex in DeleteCommandParser#parse to obtain the
index in the user input. If the index provided is invalid, an error would be thrown.
If the provided index was valid, an instance of DeleteCommand with the provided
index is created. Finally, DeleteCommand#execute is called to delete the specified
contact from the list of contacts.
An example is provided below to better illustrate the delete behaviour.
Step 1: User starts up the application and sees their list of contacts.
Step 2: User decides that they no longer want the contact in position 1 to be on their
list anymore, and hence enters delete 1 into the user input.
Step 3: DeleteCommandParser#parse is called, which calls ParserUtil#parseIndex to
obtain the index from the user input.
Step 4: An instance of DeleteCommand is created with the provided Index, and DeleteCommand#execute
is called to delete the contact from the list.
The sequence diagram below illustrates how the delete mechanism works:
Add Image Feature
Add Image Implementation
The add-image mechanism is facilitated by AddImageCommand, AddImageCommandParser and ImageUtil class.
-
AddImageCommandextendsCommand -
AddImageCommandParserextendsParser
The AddImageCommandParser parses the user input into index of contact and path to an image.
It returns a AddImageCommand with the 2 information retrieved.
AddImageCommand#execute copies the image provided by the user via a path and replaces the current image with the new
one.
It also saves the file name of the new image to the model.
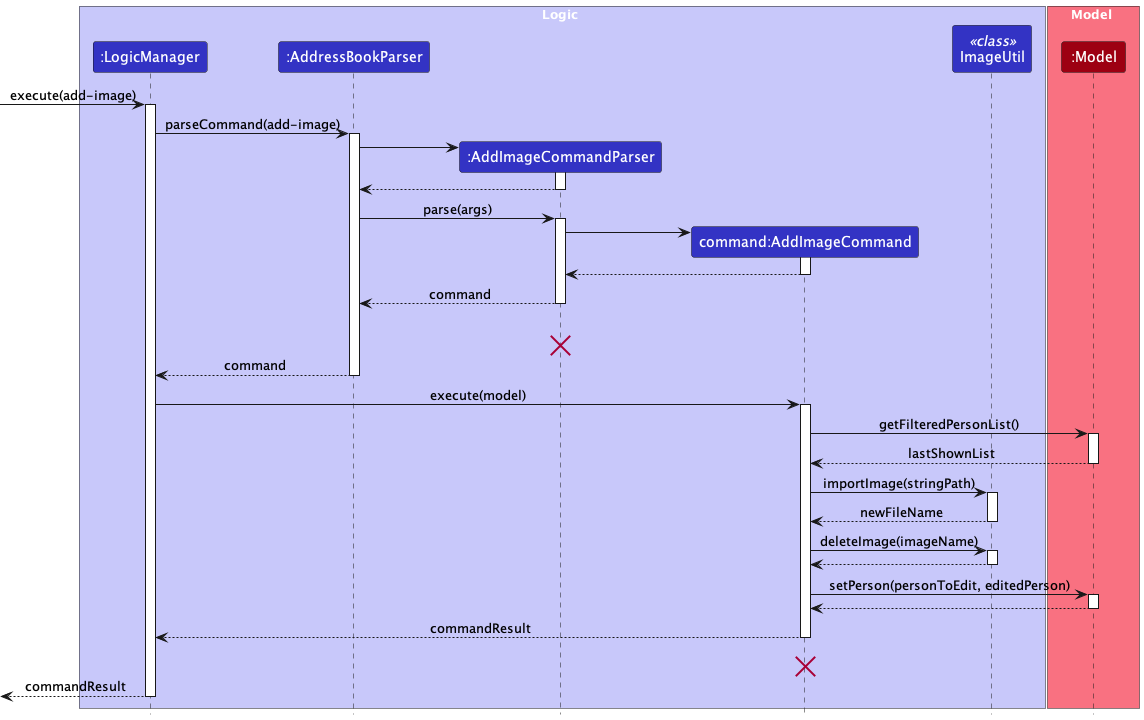
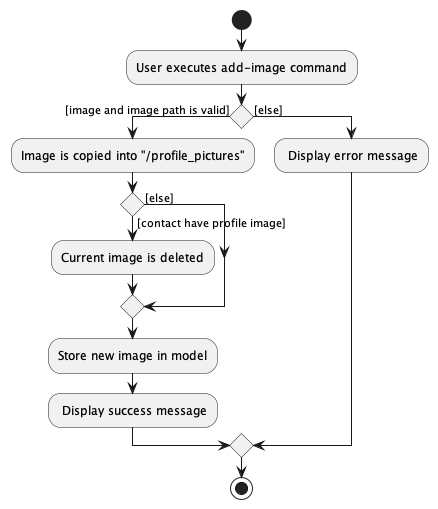
Given below is an example usage scenario and how the add-image mechanism behaves at each step.
Step 1. When user wants to add an image to a contact, they use the add-image command.
Step 2. The LogicManager receives the command text from the user input and gives it to AddressBookParser
. AddressBookParser calls AddImageCommandParser to parse the user input.
Step 3. The AddImageCommandParser retrieves the contact index as well as the image path and creates
a AddImageCommand
Step 4. AddImageCommand#execute is called. The method calls ImageUtil#importImage to copy the image into the
profile_pictures/ directory.
Once that is successful, AddImageCommand#execute proceeds to call ImageUtil#deleteImage to remove the current image.
Finally AddImageCommand#execute updates the model provided in the arguments.
Note: If the path given is invalid or if the file at the given path is not a png/jpeg image, the command will not be completed.
The following sequence diagram shows how the add-image operation works:
The following activity diagram summarizes what happens when a user executes add-image command:
Design considerations:
- Alternative 1 (current choice): Copy the image into application-created directory
- Pros:
- A single location to store/check for images
- Naming scheme determined by application
- Cons:
- Copying is a file I/O which have many caveats
- Pros:
- Alternative 2: Save the path provided by User
- Pros:
- Does not require any file I/O
- Easy to save as only the Path as a string
- Cons:
- Path is easily invalidated (e.g. user moves/deletes/renames the image)
- Pros:
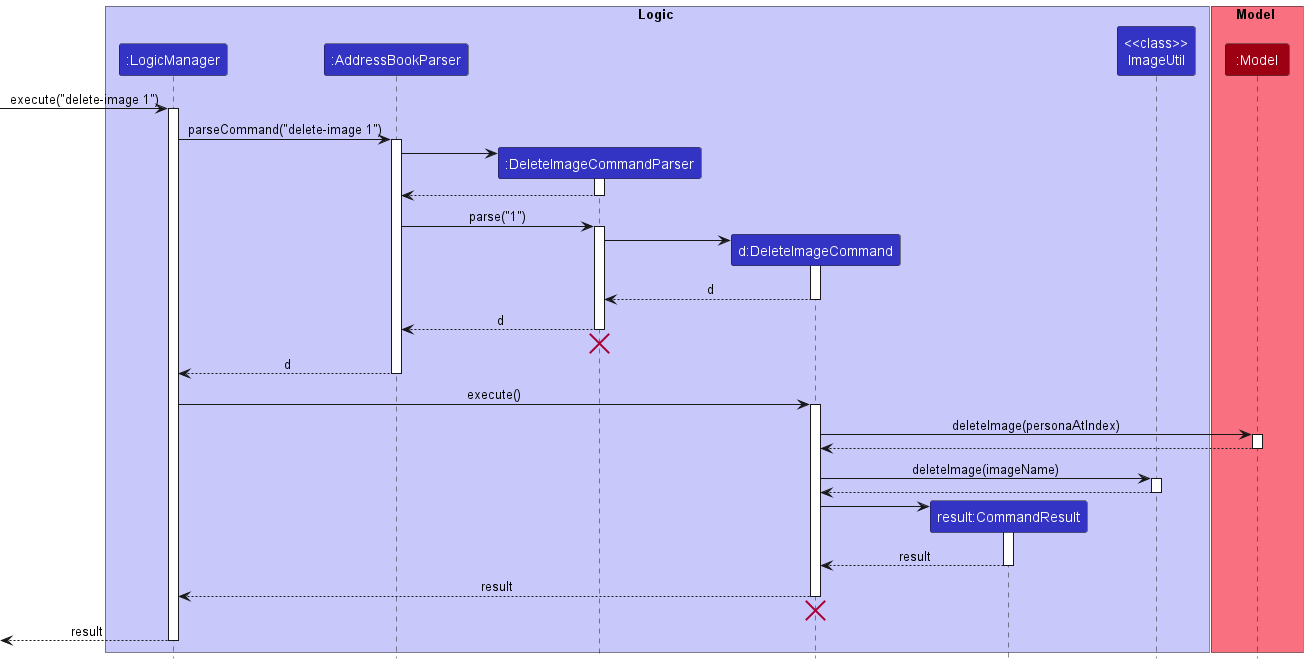
Delete Image Feature
Delete Image Implementation
The delete-image feature is facilitated by the classes DeleteImageCommand,
DeleteImageCommandParser, ImageUtil, and ParserUtil.
The DeleteImageCommandParser first parses through the user command to obtain
the desired index through using ParserUtil#parseIndex. Following which an
instance of a DeleteImageCommand containing the desired index is returned.
DeleteImageCommand#execute is then called, which sets the image of the contact
at the desired index to a default image, and deletes the existing image through
ImageUtil#deleteImage.
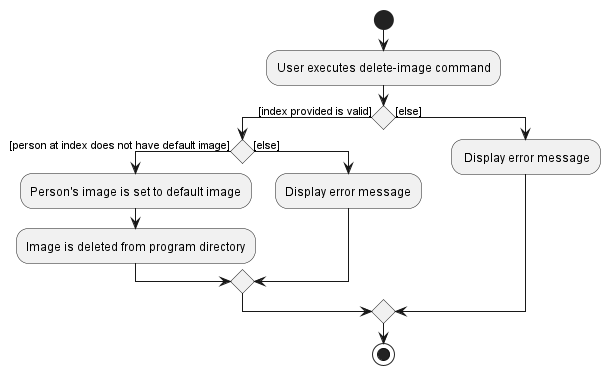
Given below is an example usage scenario for how the delete-image mechanism behaves.
Step 1: User starts up the application and sees their list of contacts. Some of which have already had an image added.
Step 2: The user decides that the image given to the contact at index 4 is not
suitable, and wants to delete it. The user inputs delete-image 4.
DeleteImageCommandParser#parse is then called to parse this input for the
desired index.
Note: If the user inputs an index of a contact which currently does not have an image, or if the user inputs an invalid index, an error will be returned to the user
Step 3: If the instruction was valid, Model#deleteImage is called to set the
image of the contact to the default image.
Step 4: ImageUtil#deleteImage is then called to delete the existing image
from the program directory.
The following sequence diagram shows how the delete-image operation works.
The following activity diagram summarizes what happens when a user executes a
delete-image command:
Design Considerations:
-
Alternative 1 (current choice): Delete the existing image file from program
directory.
- Pros:
- Ensures application does not consume excess storage
- Cons:
- Extra complexity in requiring file i/o operations
- Pros:
-
Alternative 2: Disregard deleting the image file from program directory.
- Pros:
- Easier to implement
- Cons:
- Application will take up increasingly more unnecessary storage during its lifetime of usage
- Pros:
Import Contacts Feature
Import Contacts Implementation
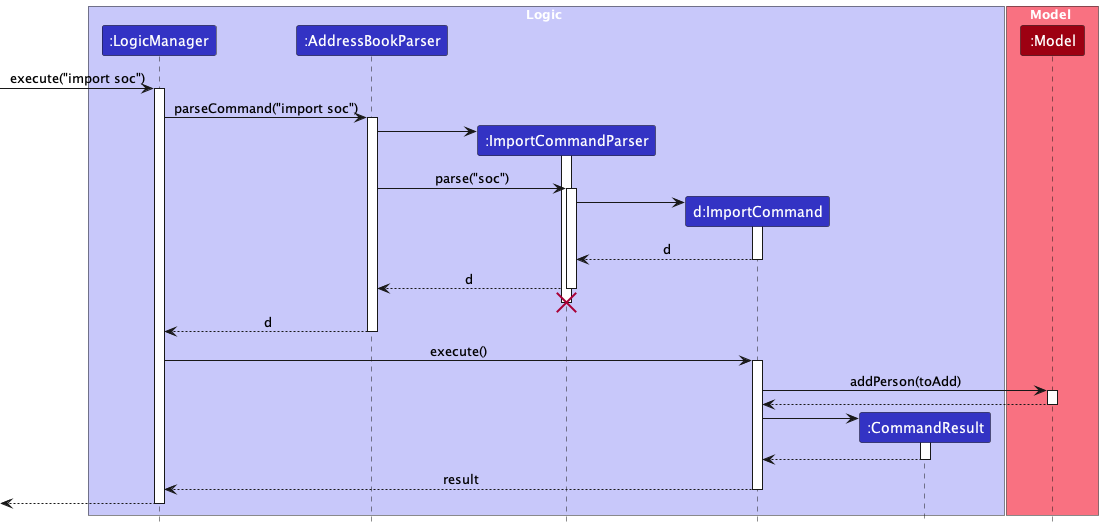
The import feature is facilitated by the classes ImportCommand, ImportCommandParser,
SocContacts and ChsContacts. The ImportCommandParser first parses through the user
command to obtain the desired faculty to be imported. An instance of
a ImportCommand containing the desired faculty from either SocContacts or
ChsContacts is then returned. ImportCommand#execute is then called,
which calls Model#addPerson to add the unique contacts into BookFace.
Given below is an example usage scenario for how the import mechanism behaves.
Step 1: User starts up the application and sees their list of contacts.
Step 2: User decides to import contacts from faculty SOC and input
import soc. ImportCommandParser#parse is then called to parse
this input for the desired faculty.
Note: If the user inputs a faculty that does not exist, an error will be returned to the user
Step 3: If the faculty was valid, ImportCommand#execute is called
with the valid faculty that was parsed
Step 4: Model#addPerson is called for however
many non-duplicate contacts are to be added.
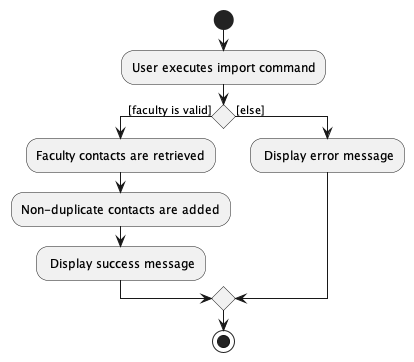
The following sequence diagram shows how the import command works.
The following activity diagram summarizes what happens when a user executes an
import command:
Design Considerations:
-
Alternative 1 (current choice): ImportCommand#execute takes in a string to
determine which faculty of in-built contacts to import
- Pros:
- User input is easily parsed (as it is just a string), faster to read and execute the command
- Cons:
- Possibly bad OOP design, ImportCommand#execute should take in a Faculty object
- Pros:
-
Alternative 2: ImportCommand#execute takes in a Faculty object instead of a string
to determine which faculty of in-built contacts to import
- Pros:
- Better OOP design then simply taking in a string
- Cons:
- Input will take longer to parse as the string input has to be parsed into a faculty object to be used as input to ImportCommand#execute
- Pros:
Find Feature
Find Implementation
The Find feature allows users to filter out relevant contacts from their contact list.
This feature is facilitated by the FindCommand class and the FindCommandParser class,
as well as the various predicate classes listed below.
AddressContainsKeywordPredicateEmailContainsKeywordPredicateNameContainsKeywordPredicatePhoneContainsKeywordPredicateStatusContainsKeywordPrediateTagContainsKeywordPredicate
When the user inputs a find command, the FindCommandParser parses through the
input to obtain the prefixes and keywords that the user has entered. For each
prefix-keyword pair, an instance of its associated predicate class is created
and all the instances are combined with Predicate#and. This final predicate
object is then passed to Model#findOrListContents to display the filted list to
the user.
An example usage scenario is provided below to illustrate the mechanism of the
find command.
Step 1: User starts up the application and sees a list of all their contacts.
Step 2: User inputs find t/cs2103 to find the list of his contacts that takes
CS2103.
Step 3: FindCommandParser parses through the user input and creates an instance
of TagContainsKeywordPredicate containing the keyword “cs2103”. An instance of
FindCommand with this predicate is then created and returned.
Step 4: FindCommand#execute is called, which calls Model#findOrListContents
to display the final filtered list to the user.
The sequence diagram below illustrates this process.
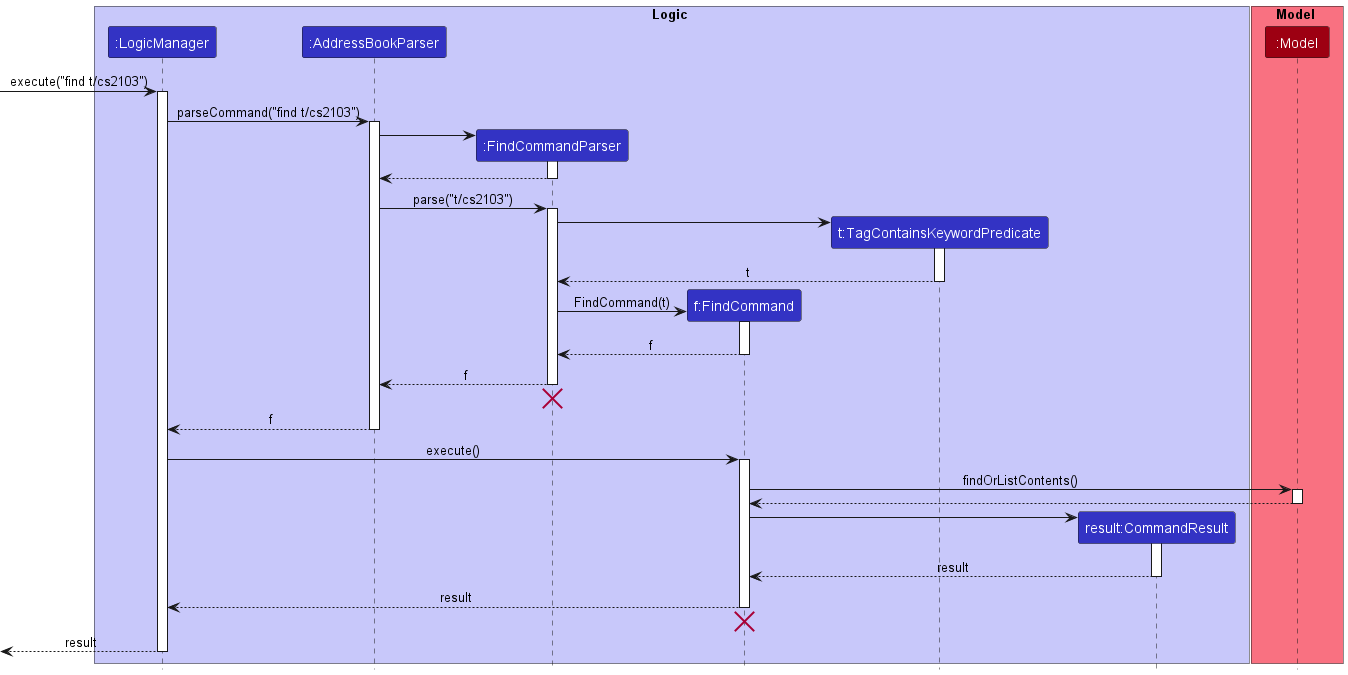
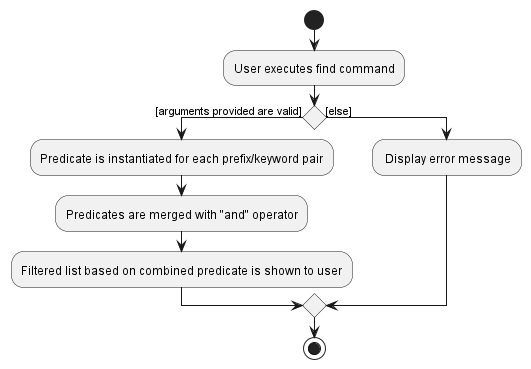
The following activity diagram summarizes what happens when a user executes
the find command:
Design Considerations:
Aspect: Combining the predicates from multiple prefixes
-
Alternative 1 (current choice): Using
Predicate#and -
Alternative 2: Using
Predicate#or
Rationale: Decision was made to use a logical AND instead of OR when
combining multiple predicates as we believe this was the more intuitive approach.
When a user is looking for a specific group of people on his contacts, they would
expect the application to return a list of contacts that matches all of his
given input requirements, instead of a list of contacts that contains one or more
of the keywords that was entered. Hence, the logical AND was decided to be more
appropriate, and Predicate#and was used.
Edit Feature
Edit Implementation
The Edit feature is facilitated by the classes EditCommand,
EditCommandParser and ParserUtil.
The EditCommandParser first parses through the user command to obtain
the necessary inputs through using ParserUtil#parseIndex. Following which an
instance of a EditCommand containing the details encapsulated in Person class is returned.
EditCommand#execute is then called, which sets the image of the contact
at the desired index to a default image.
Given below is an example usage scenario for how the edit mechanism behaves.
Step 1: User wants to edit a specific person in the contact list. He first enters the edit command, index, follow by the prefix and input value he wants. Note that index that is equals or less than zero will result in an exception thrown.
Note: If the user wants to edit a contact that does not exist in the contact list, an error will be thrown.
Step 2: If the instruction was valid, EditCommand#execute is called to update the details into an existing person.
The following sequence diagram shows how the edit operation works.
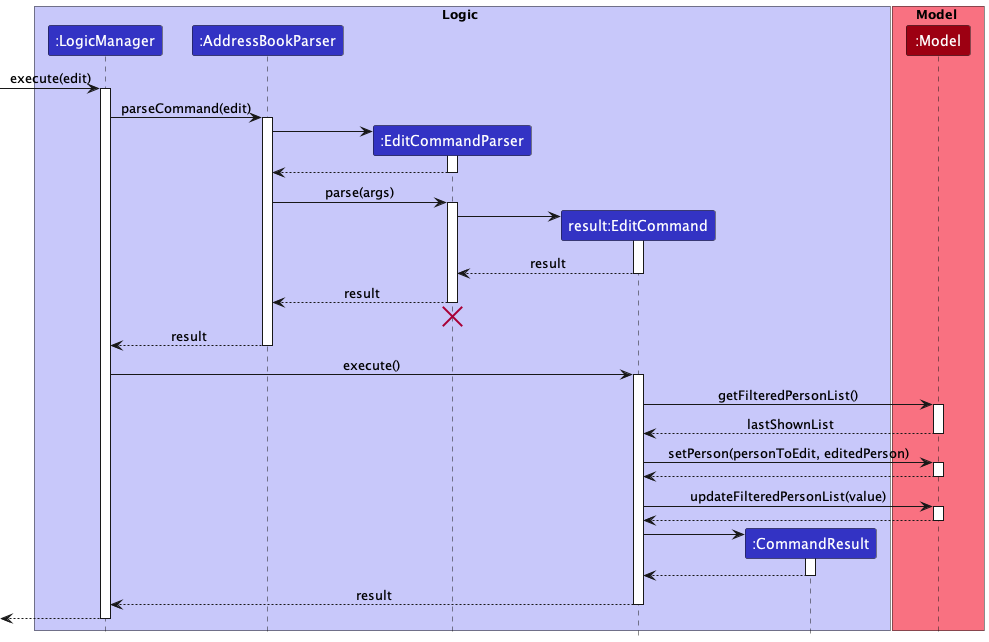
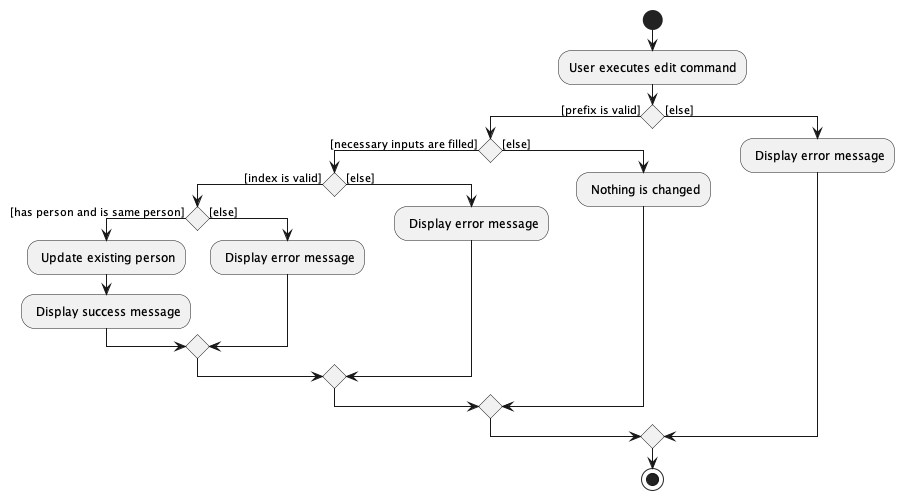
The following activity diagram summarizes what happens when a user executes a
edit command:
Design Considerations:
-
Implemented: Edit tags based on the tag type instead of replacing all
- Pros:
- Edit a tag will not replace all the tags of other tags
- Cons:
- Extra complexity in requiring to map the additional tag operations
- Pros:
-
Implemented: Tag name is able to fix in the GUI frame and should not overflow
- Pros:
- To reduce chances of missing or hidden texts
- Pros:
Appendix: Requirements
Product Scope
Target user profile:
Students from the National University of Singapore (NUS) who need to keep track of their contacts from different classes/ccas/clubs etc.
Value proposition:
NUS Students often take many classes and meet different people. This application helps them to organise their contacts list for an easier way to set up proper communication channels. This makes it easier for students to form connections with their peers during their time in University.
User stories
- As a student, I can find all relevant university contacts/POCs for various purposes
- As a student, I can delete the image for a person on my contact list
- As a forgetful student, I can see who a person on my contact list looks like
- As a user, I can add a contact so that I can keep track of my contacts.
- As a user, I can view all contacts so that I can have an accessible list of contacts.
- As a user, I can delete a contact so that I can remove unneeded and/or incorrect contacts.
- As a student, I can to find other students in my classes that have been added as a contact so that I can ask them for help
Use cases
System: BookFace
Use case: UC1 - Add Contact

Actor: User

MSS:
1. User chooses to add a contact.
2. User enters contact's details.
3. New user's contact's details are added to BookFace.
Use case ends.

Extensions:

2a. BookFace detects incomplete/invalid details entered.
BookFace displays an example of valid details.
System repeats Step 1-2 until valid details are entered.
Use case: UC2 - Delete Contact

Actor: User

MSS:
1. User chooses to delete a contact.
2. User enters contact's index.
3. Contact is deleted from BookFace.
Use case ends.

Extensions:

2a. BookFace detects incomplete/invalid index entered.
BookFace displays an example of a valid index.
System repeats Step 1-2 until valid information is entered.
Use case: UC3 - Edit Contact

Actor: User

MSS:
1. User chooses to edit a contact.
2. User enters contact's new details.
3. Contact is edited in BookFace.
Use case ends.

Extensions:

2a. BookFace detects incomplete/invalid details entered.
BookFace displays an example of valid details.
System repeats Step 1-2 until valid details are entered.
Use case: UC4 - Find Contact

Actor: User

MSS:
1. User chooses to find a contact.
2. User enters contact's name.
3. BookFace displays the matching contacts.
   Use case ends.

Extensions:

2a. BookFace detects no name entered.
BookFace displays an example of a valid name.
System repeats Step 1-2 until a name is entered.
Use case: UC5 - List Contacts

Actor: User

MSS:
1. User chooses to view all contacts.
2. BookFace displays all the user's contacts.
   Use case ends.
Use case: UC6 - Get Help on Commands

Actor: User

MSS:
1. User chooses to view instructions on how to use BookFace.
2. BookFace displays a url to its User Guide.
   Use case ends.
Use case: UC7 - Add Image for a Contact
Actor: User
MSS:
1. User chooses to add an image for a contact.
2. User enters contact index and image file path.
3. Image is added for contact.
   Use case ends.

Extensions:

2a. BookFace detects invalid/incomplete filepath or index.
BookFace displays an example of a valid filepath and index.
System repeats Step 1-2 until valid information is entered.
Use case: UC8 - Delete Image for a Contact

Actor: User

MSS:
1. User chooses to delete an image for a contact.
2. User enters contact index.
3. Image is deleted for contact.
   Use case ends.

Extensions:

2a. BookFace detects incomplete/invalid index entered.
BookFace displays an example of a valid index.
System repeats Step 1-2 until valid information is entered.

2b. BookFace detects that the contact does not have an image added.
Use case ends.
Use case: UC9 - Import Contacts from a Faculty

Actor: User

MSS:
1. User chooses to import contacts for a faculty.
2. User enters faculty name.
3. New contacts' details are added to BookFace.
   Use case ends.

Extensions:

2a. BookFace detects incomplete/invalid details entered.
BookFace displays an example of valid details.
System repeats Step 1-2 until valid details are entered.
Glossary
- NUS: The National University of Singapore
- Student: A user who belongs to a faculty in NUS and attends one or more classes with other students
- Tutor: A user who tutors students in one or more classes
- Faculty: A group of university departments concerned with a major division of knowledge
- Contact: A person of interest whose details have been recorded by the user
Planned Enhancement
- Currently, when attempting to retrieve image and is unsuccessful, the default image is displayed. We plan to include and display an “error image” instead of default image to better express to user that the retrieval was unsuccessful. With this error image, the
delete-imagecommand on this contact will change it to default image. Currently, it only shows a success message as the image is already the default image.
Ways that retrieval can be unsuccessful:- Erroneous editing of Image field in
addressbook.json - Removing/changing images saved in
/profile_picturesto invalid images or to a non-matching file name
- Erroneous editing of Image field in
- Currently, there are no restrictions regarding image size for the
add-imagecommand. We plan to impose a minimum image size restriction to prevent images that are too small. - Currently, imported contacts from the
importcommand are not filled up with real data. We plan to use external resources to find these data to fill up the imported contacts with. We also plan to include even more relevant contacts, as only 2 contacts are imported for each faculty as of now. - Currently, the
importcommand only allows importing contacts from 2 faculties. Again, we plan to include more faculties in the list of faculties available for import by using external resources to retrieve more data about contacts from different faculties.